Knittlations
I the coolest
Christmas tree skirt
(Jan 2021 - Mar 2021, Nov 2021) Fair isle Christmas tree skirt.
Details
- Yarn: Caron One Pound in Scarlet; Red Heart Super Saver in White (100% acrylic)
- Needle size: 10.5 (6.5mm)
Notes
After having made so many pairs of socks recently, I’ve been itching to do a project with heavier yarn weight to give my eyes and hands a break. I’ve done a handful of fair isle projects in the past - see Christmas stockings! - but I wanted to try again now that I knit continental to see if it is easier.
I saw the perfect pattern on Reddit but it cost $6.50 and I am a cheapo. I still haven’t ventured into purchasing patterns yet. So I decided to find a free pattern instead and adapt it to incorporate some colorwork.
Knit in the round and steek
The paid pattern that I liked used wool yarn, was knit in the round, and then steeked (aka cut!) for the tree skirt opening. The free pattern was knit flat in 7 separate panels and then seamed together. Given that I wanted to do colorwork and was worried about tension on the purl side, I decided to knit my tree skirt in the round and steek it.
Steek complications
Steeking is usually only recommended for wool fiber so that the edge once cut will felt together. But part of the whole goal of this project is to use up some cheap acrylic yarn. So I wanted to try to steek my cheap 100% acrylic yarn. I did a couple test swatches, and have decided to combine the crochet method and the knit facing method with some (more) modifications.
| 1 | 2 | 3 | 4 | 5 | 6 | 7 | 8 | 9 | ||
| p | k | k | k | k | k | k | k | k | k | p |
The facing knit out of the first row of purl bumps connects to stitch 2 (red) and the facing knit out of the last row of purl bumps connects to stitch 8 (red). This hides the white edge while keeping short floats across the steek (as recommended). The crochet steek is done along stitch 5: right leg of stitch 4 and left leg of stitch 5; and right leg of stitch 5 and left leg of stitch 6.
In my test swatches, the steek using the two of these methods in combination was successful! Even with 100% acrylic yarn!
Cable
Due to the way that I modified the pattern to be knit in the round instead of in flat panels, I need a really long cable (long enough to fit the circumference of the completed tree skirt). By my calculations, that means for a tree skirt of 50” diameter (which is about how large I expect mine to be), I’ll need a 150” cable! I only have a 40” cable!
So I bought a 60” cable, and I also found out that my interchangeable needle set came with one cable connector. This means that I can combine my new 60” cable with my 40” cable and at least reach 100”. Hoping that the 60” cable I bought comes with another cable connector, and then I should be able to squeeze all the stitches onto the cable. Fingers crossed!
Update: My 60” cable didn’t come with another cable connector :( So I will probably either 1) try to squeeze all the stitches onto the 100” cable (40” + 60”), or I will buy another 60” cable (but that feels a little unnecessary), or I will buy Knit Picks cable connectors (only $2 for 3 cable connectors! But shipping is $6 which I don’t want to pay because again, I am a cheapo), or I will buy other cable connectors (which are free shipping on Amazon) and hope that they are compatible with my interchangeable needle set. Will update again when I decide!
Colorwork
In the free pattern that I was adapting, the panels were worked in one color with cables added to make it a little more interesting. It looks like a nice pattern, but I wanted to do some colorwork! So I drew up some colorwork charts. The hardest part was the fact that this was worked in discrete panels and that the bottom of the chart (further away from the tree) was wider than the top of the chart (closer to the tree). So any pattern that I did had to flow evenly across both the top (narrower) and bottom (fatter) part of each pannel.
In the end, I decided to have a pattern for each panel, so unfortunately each panel will be able to be clearly distinguished from the others, but I couldn’t figure out another way to do it. In the paid pattern, it somehow looks super nice and uniform and like one single piece instead of multiple panels. I have no idea how they did it. Perhaps at the end of all of this work, I will end up paying for the pattern just to satisfy my curiosity.
I did a bunch of different variations - snowflake with versus without cables, larger versus smaller snowflakes, other patterns like Christmas trees, etc. I’ll keep all those charts just in case for the future!
Size
I am super worried about running out of yarn! It’s not too big of a deal because I can just buy more, but 1) I am worried about dye lots :( this yarn is super old, and 2) the whole point of this project was to get rid of yarn not buy more! So I decided to make the tree skirt a little smaller than described in the free pattern (a total of 123 instead of 148 rows) but it will likely be roughly the same size.
Carrying floats
So I didn’t realize this when I was designing the pattern, but apparently traditional fair isle patterns generally try to design the pattern such that one color is never carried for more than ~5 stitches at a time. Otherwise the float is too long and it can get too messy. Well, I didn’t know this and especially in the beginning of the pattern, I have SUPER sparse colorwork. So I tried researching how to handle this. I went down this very deep rabbit hole, but to summarize, there are probably 3 ways to do this:
- Catch long floats: By hooking the working yarn over the float yarn, you can trap the float against the fabric even if you don’t knit a stitch with it. This is how I carried long floats in my colorwork Christmas stockings, but there is a crucial trick to this: You can’t catch the float on the same column of stitches every row! Otherwise the color will end up showing through a bit, which is exactly what happened on parts of my Christmas stockings :( Instead, it is recommended that you offset the column on which you catch the float every row. So if I have 8 stitches between 2 colors, then I will alternate between catching on stitch 4 and 5.
- Ladderback jacquard: I discovered this mysterious technique on my deep rabbit hole and I was bewhildered by what the heck ladderback jacquard was! What is a ladderback? And what is a jacquard? I now somewhat understand the technique, but still don’t understand what the heck the name means! Oh well! Anyways I won’t describe the technique in detail because you can just see how to do it here, but at a high level, you knit a sort of sparse duplicate layer of stitches on the backside of the work in the color of the float. It is apparently similar to double knitting, but you essentially end up with a web of stitches on the back of the work which is separate from the work itself. From what I have seen, it seems like this is a little more foolproof in hiding the float color behind the work.
- As an aside, something else I discovered while researching all this is something called intarsia! It is essentially a colorwork strategy but for highly concentrated areas of color. See this video. It looks like it is easiest flat, but some videos indicate that you can also do it in the round, although much more complicated!
- Duplicate stitch: The last potential method was just knitting in the standard color, and then duplicate stitching on the white after the fact. This has the advantage of not needing to carrying the float at all, but instead just has the bit of white in the stitch where it is needed. It has the disadvantage of having a million ends to weave in!
The problem with both #1 and #2 for super sparse colorwork (e.g. in the top part of my pattern, I only had one white stitch every like 50 stitches every few rows) is that I still need to carry the white along which ends up wasting a lot of yarn! And remember - I am a cheapo. So I ended up deciding to use #3 in the areas where it is super sparse colorwork, and #2 for the areas where it starts to use white a little more regularly (row 65 in the pattern). I didn’t have a significant preference for #1 vs. #2 for post row 65, but I figured might as well do #2 in the spirit of learning something new.
One thing that I didn’t anticipate with using duplicate stitch in the super sparse colorwork sections though, is that you can see a little of the white peeking through the red from the end that is weaved in. I don’t know if I just didn’t weave in well, if the yarn is just cheap (the ends split really easily and then it is even more obvious), or if it is just inevitable. But I don’t really like the way it looks so perhaps I will just end up taking out all the little flecks of white in the end. But on the bright side, the stitch markers (the openable and closeable ones that Joe got me in my Darn Good Yarn boxes) were SUPER useful and I probably wouldn’t have been able to do this at all without those stitch markers! Yay for the hubby!
Timeline
-
~Early Jan: Designed pattern and practiced some steeks!
-
~1/15/2021: Finished designing the pattern and started knitting!
-
2/1/2021: I finally got to the part where I can start my ladderback jacquard white (instead of needing to duplicate stitch every individual stitch)! But I am almost out of red and I don’t want to start the ladderback jacquard part until I get more red because it will be harder to store/transport the project is 2 balls of yarn are attached to the work than 1. So I will need to go to the store and buy more red yarn. Feels so counterproductive because the goal of this project was to use up yarn, not buy more! I am thinking I will probably run out of white too… So perhaps I should buy more white while I’m there too. Sigh… I am also starting to slow down on the project; because the row lengths are increasing, each round takes longer and longer :/ I calculated it too - I am on row 66 out of 123 but if you go by % of stitches in the project, I am only 37% of the way through :( And I am already getting sick of stockinette. Well I guess that’s why I started it in January, I have all year to finish it by Christmas!
-
2/25/2021: Well I took a little bit of a break to knit myself the speckled space socks, but I’m back at it again! I bought a skein of yarn which out of all the yarn at Michaels, looked the most similar. It was Caron One Pound in Scarlet. I have a little ball of my old skein left, and I plan to alternate rows with my new skein and old skein to hopefully reduce any noticeable change in color due to dye lot. Wish me luck on this ladderback jacquard!
-
3/21/2021: I ran out of white yarn! :( I thought I might make it because it was lasting me a long time at the beginning but I ran out :( I went to the most wonderful Joann in Frederick though to buy new yarn (it was on the way back from Deep Creek Lake) and it was huge and wonderful! But we were in a rush so I just ran in, got my yarn, got a 40% off coupon!, and then ran out.
Also I feel very very silly, but I ended up not doing ladderback jacquard. Yep, you heard that right :/ I just figured it was way too much effort especially because it would’ve only been relevant for a few rows because after that the floats get short enough for regular floats. So I decided to just carry the floats along and stagger where I carry them so that they don’t show through to the front. But I feel a little silly because I spent so much time learning ladderback jacquard for nothing! Oh well, I suppose it may be helpful at some point in the future. -
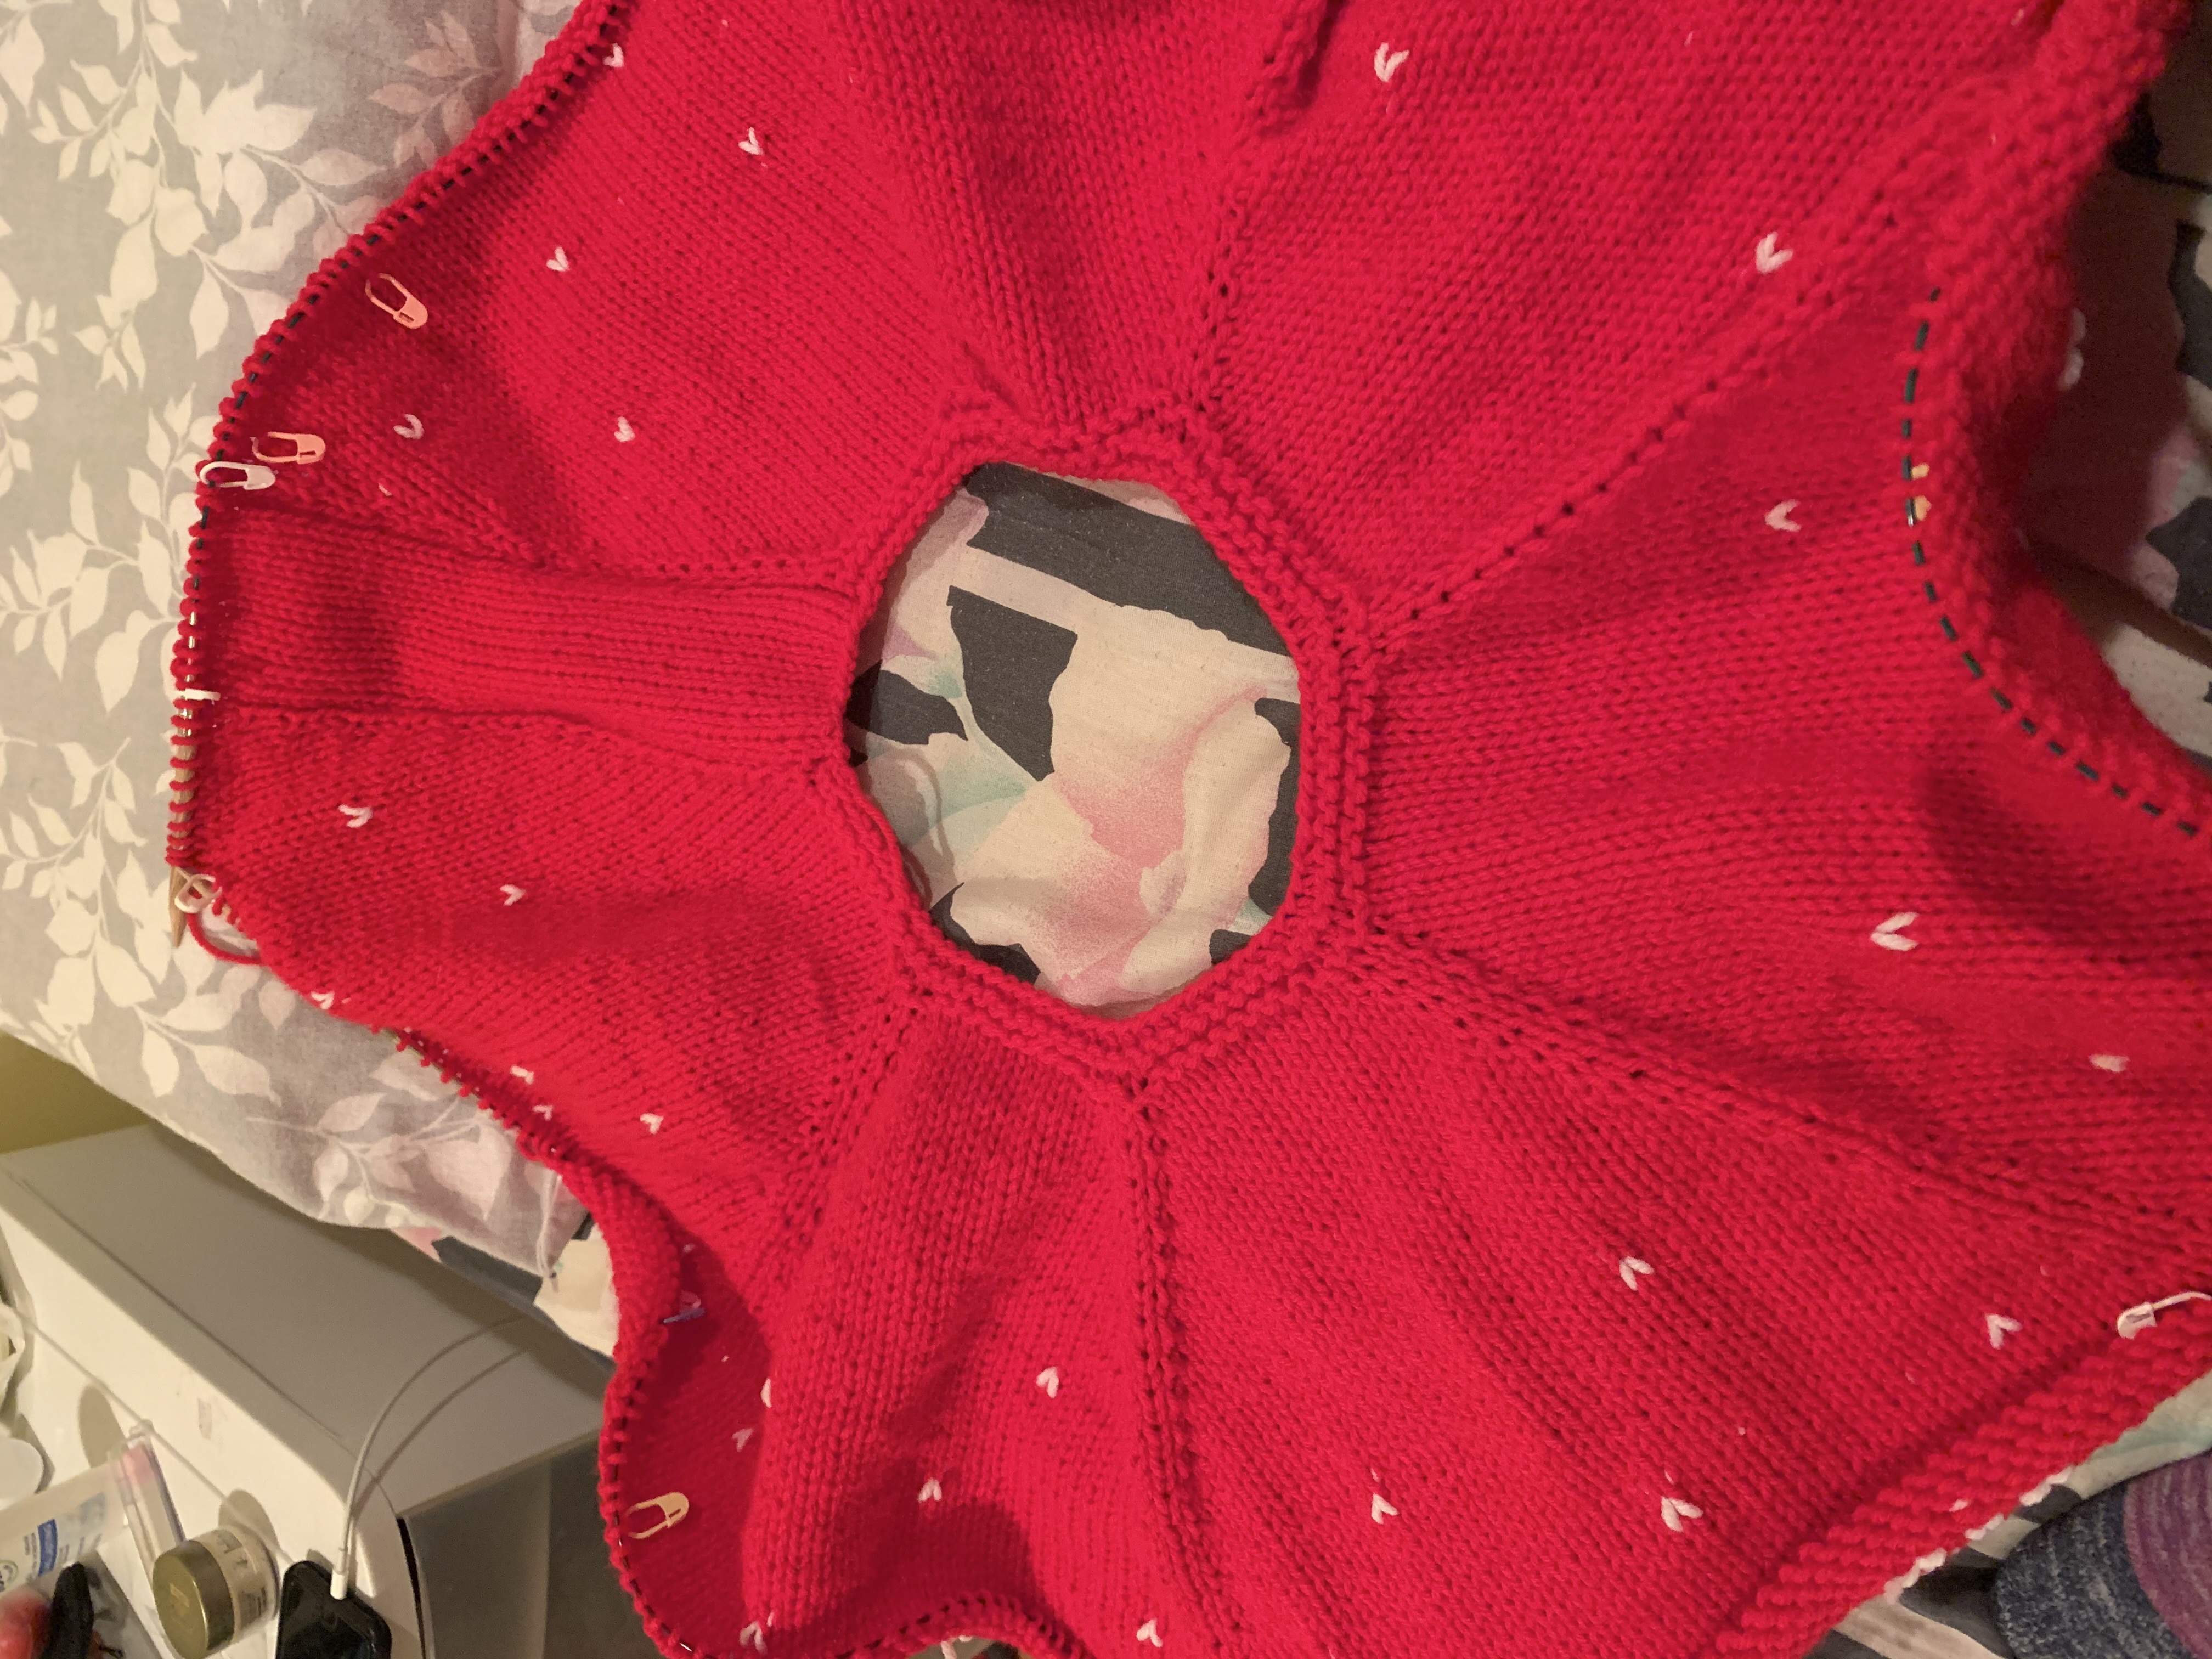
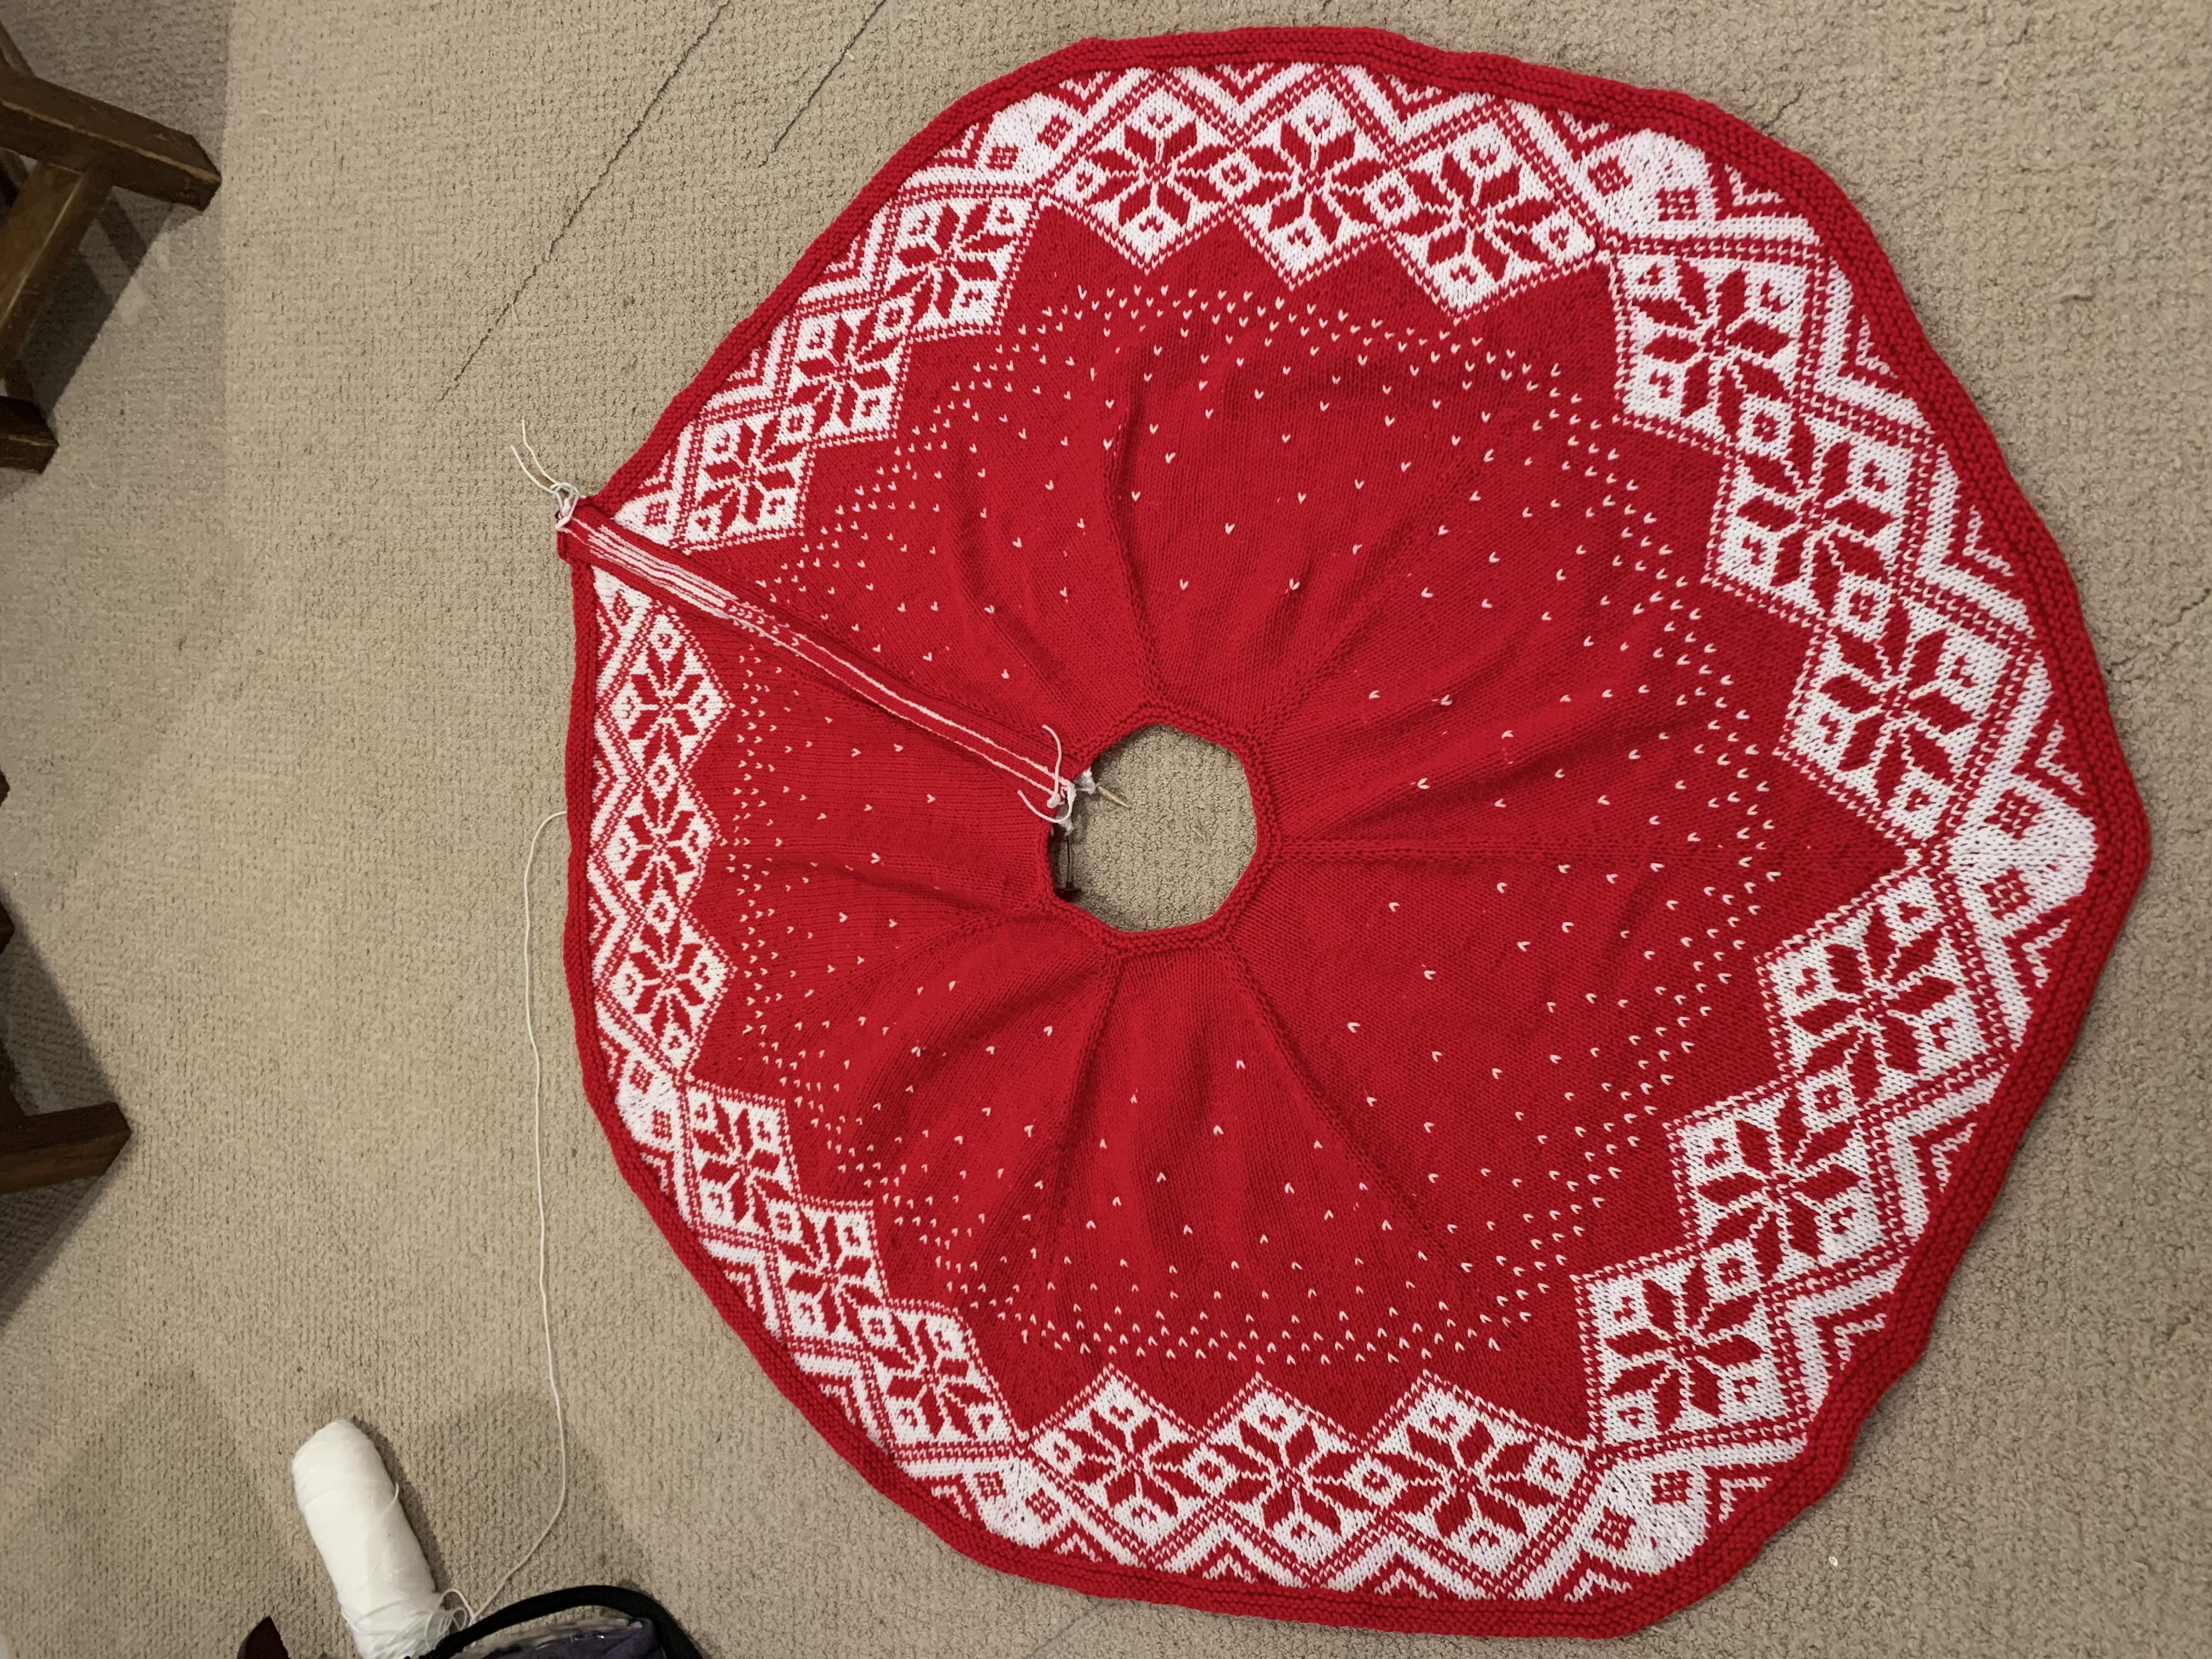
3/25/2021: Well the colors for both the red and white seem to match! At least from what I can tell. I have made lots of progress on the tree skirt and am almost done with the white colorwork part! I am so close! See below for a progress picture.
-
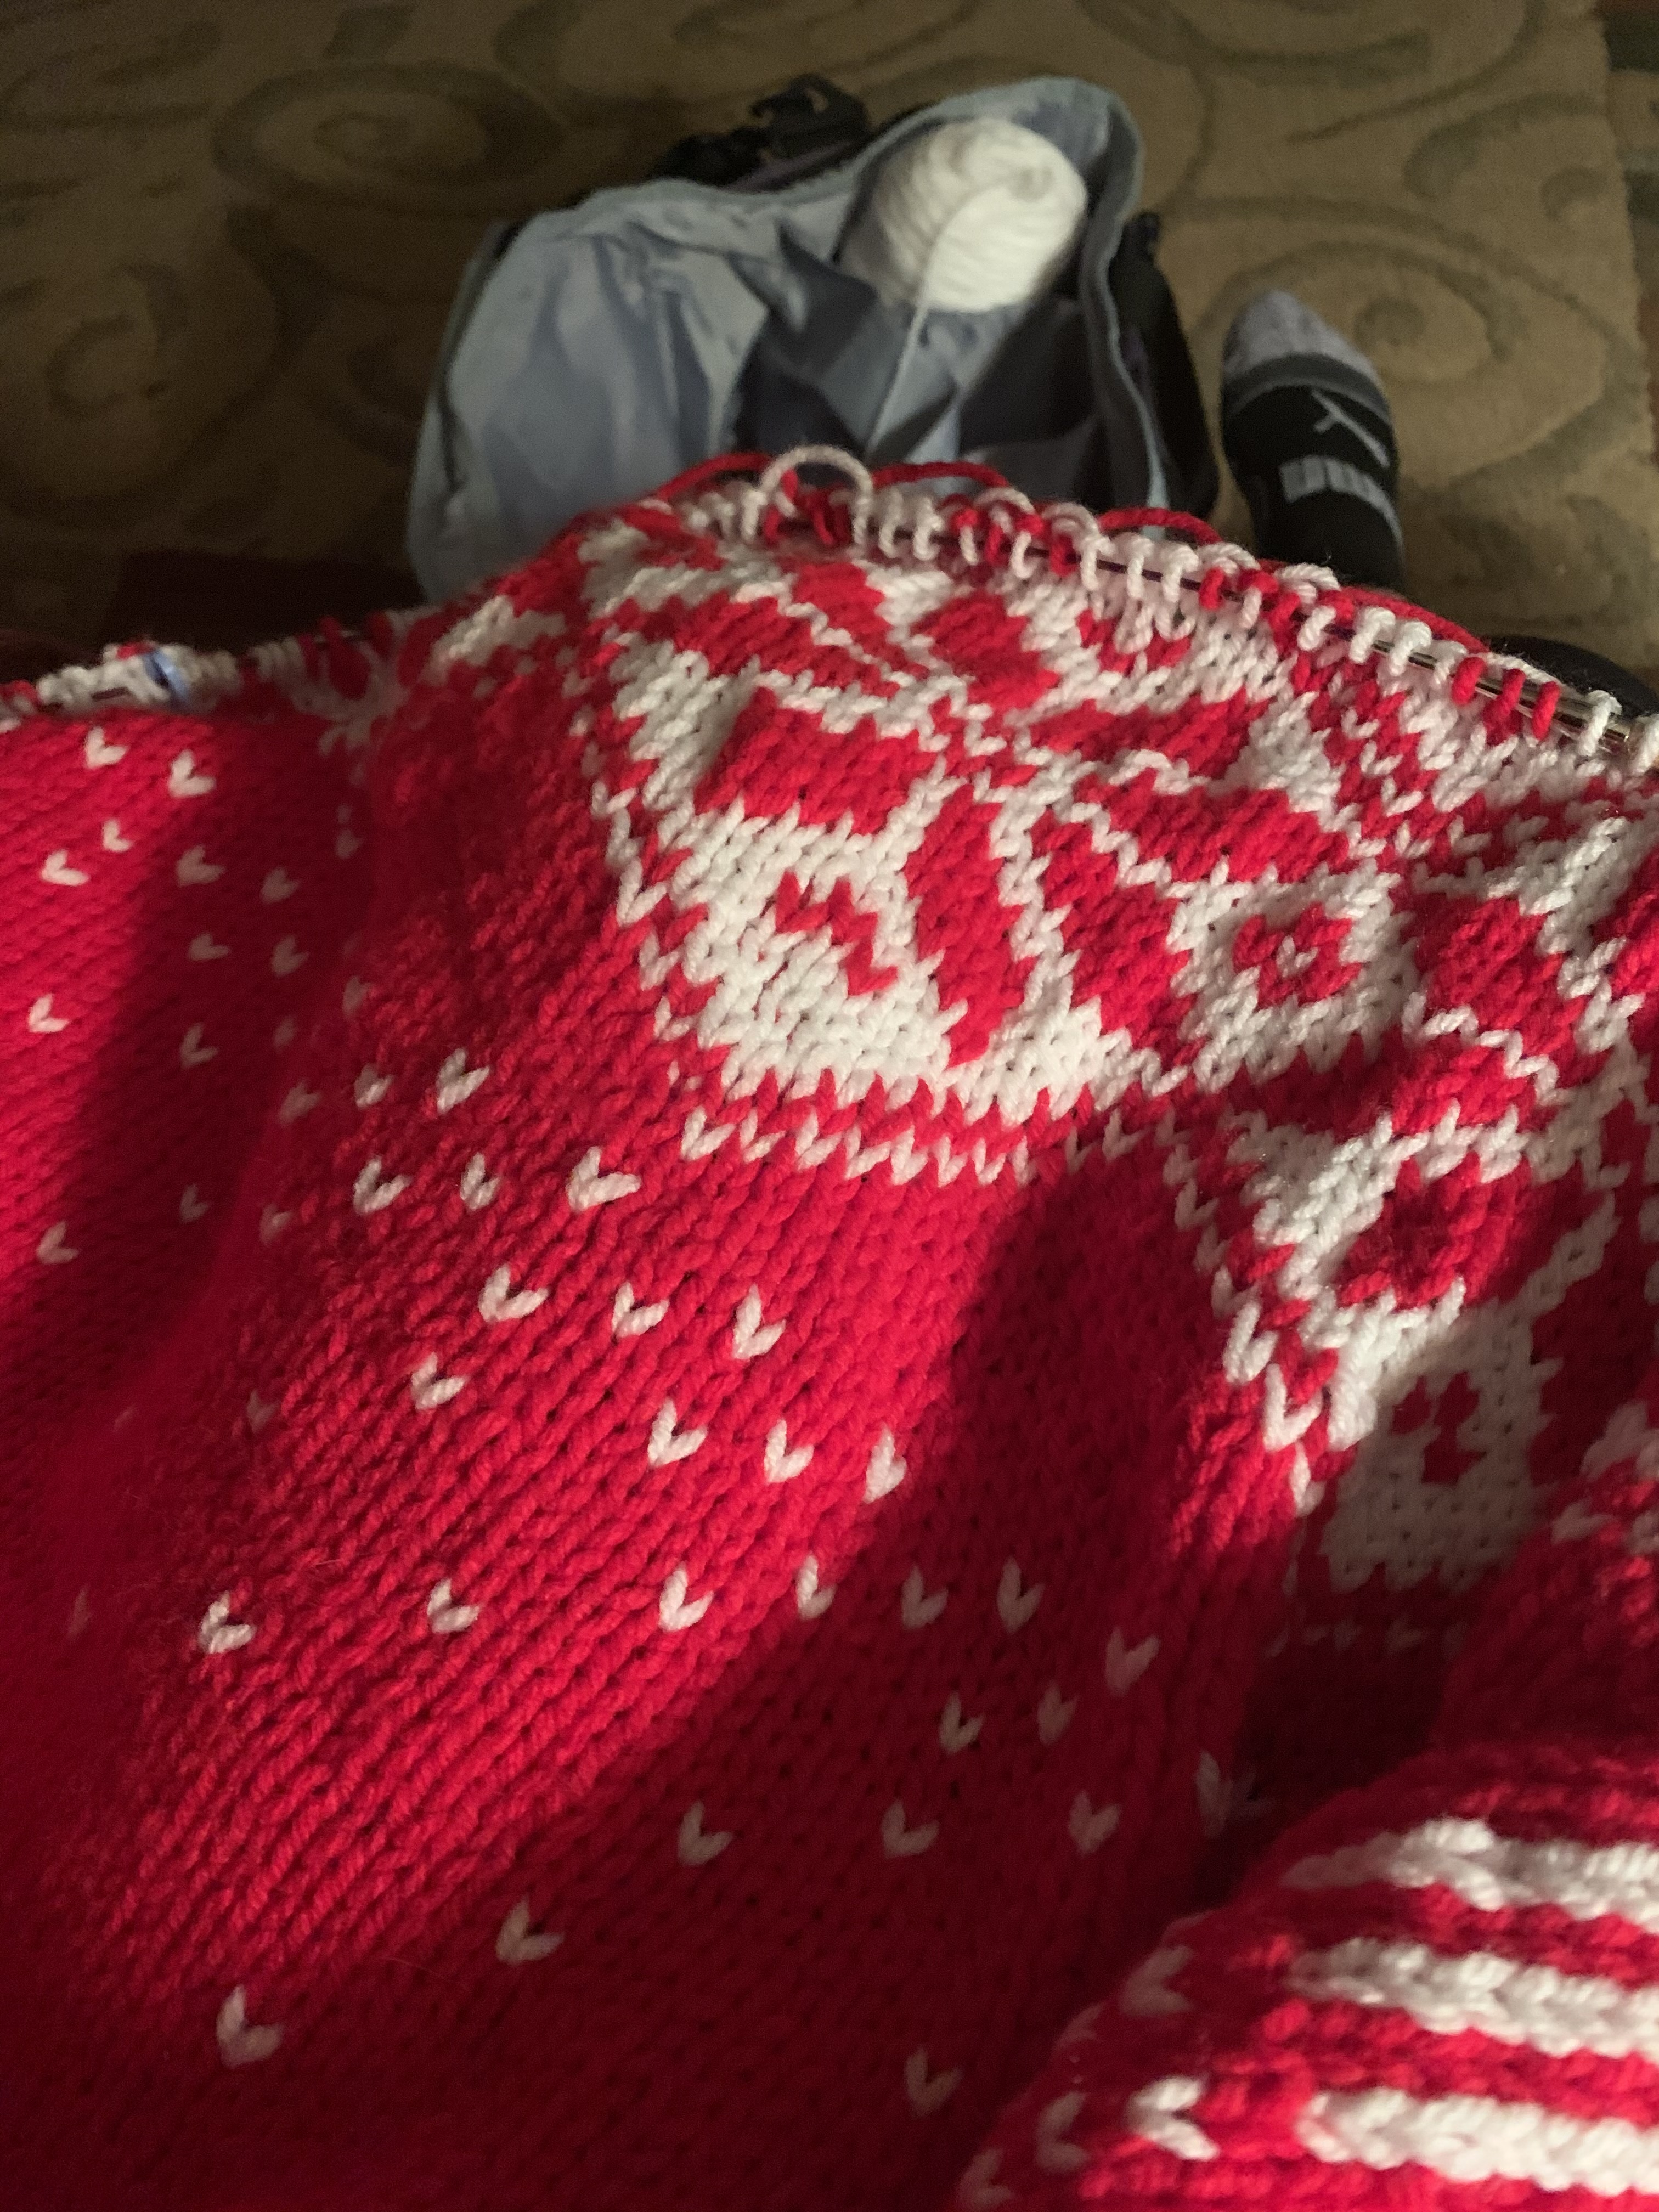
3/28/2021: I am finally done!!! I haven’t decided if I will cut the steek or not, Joe doesn’t think I should. I guess we will see!
-
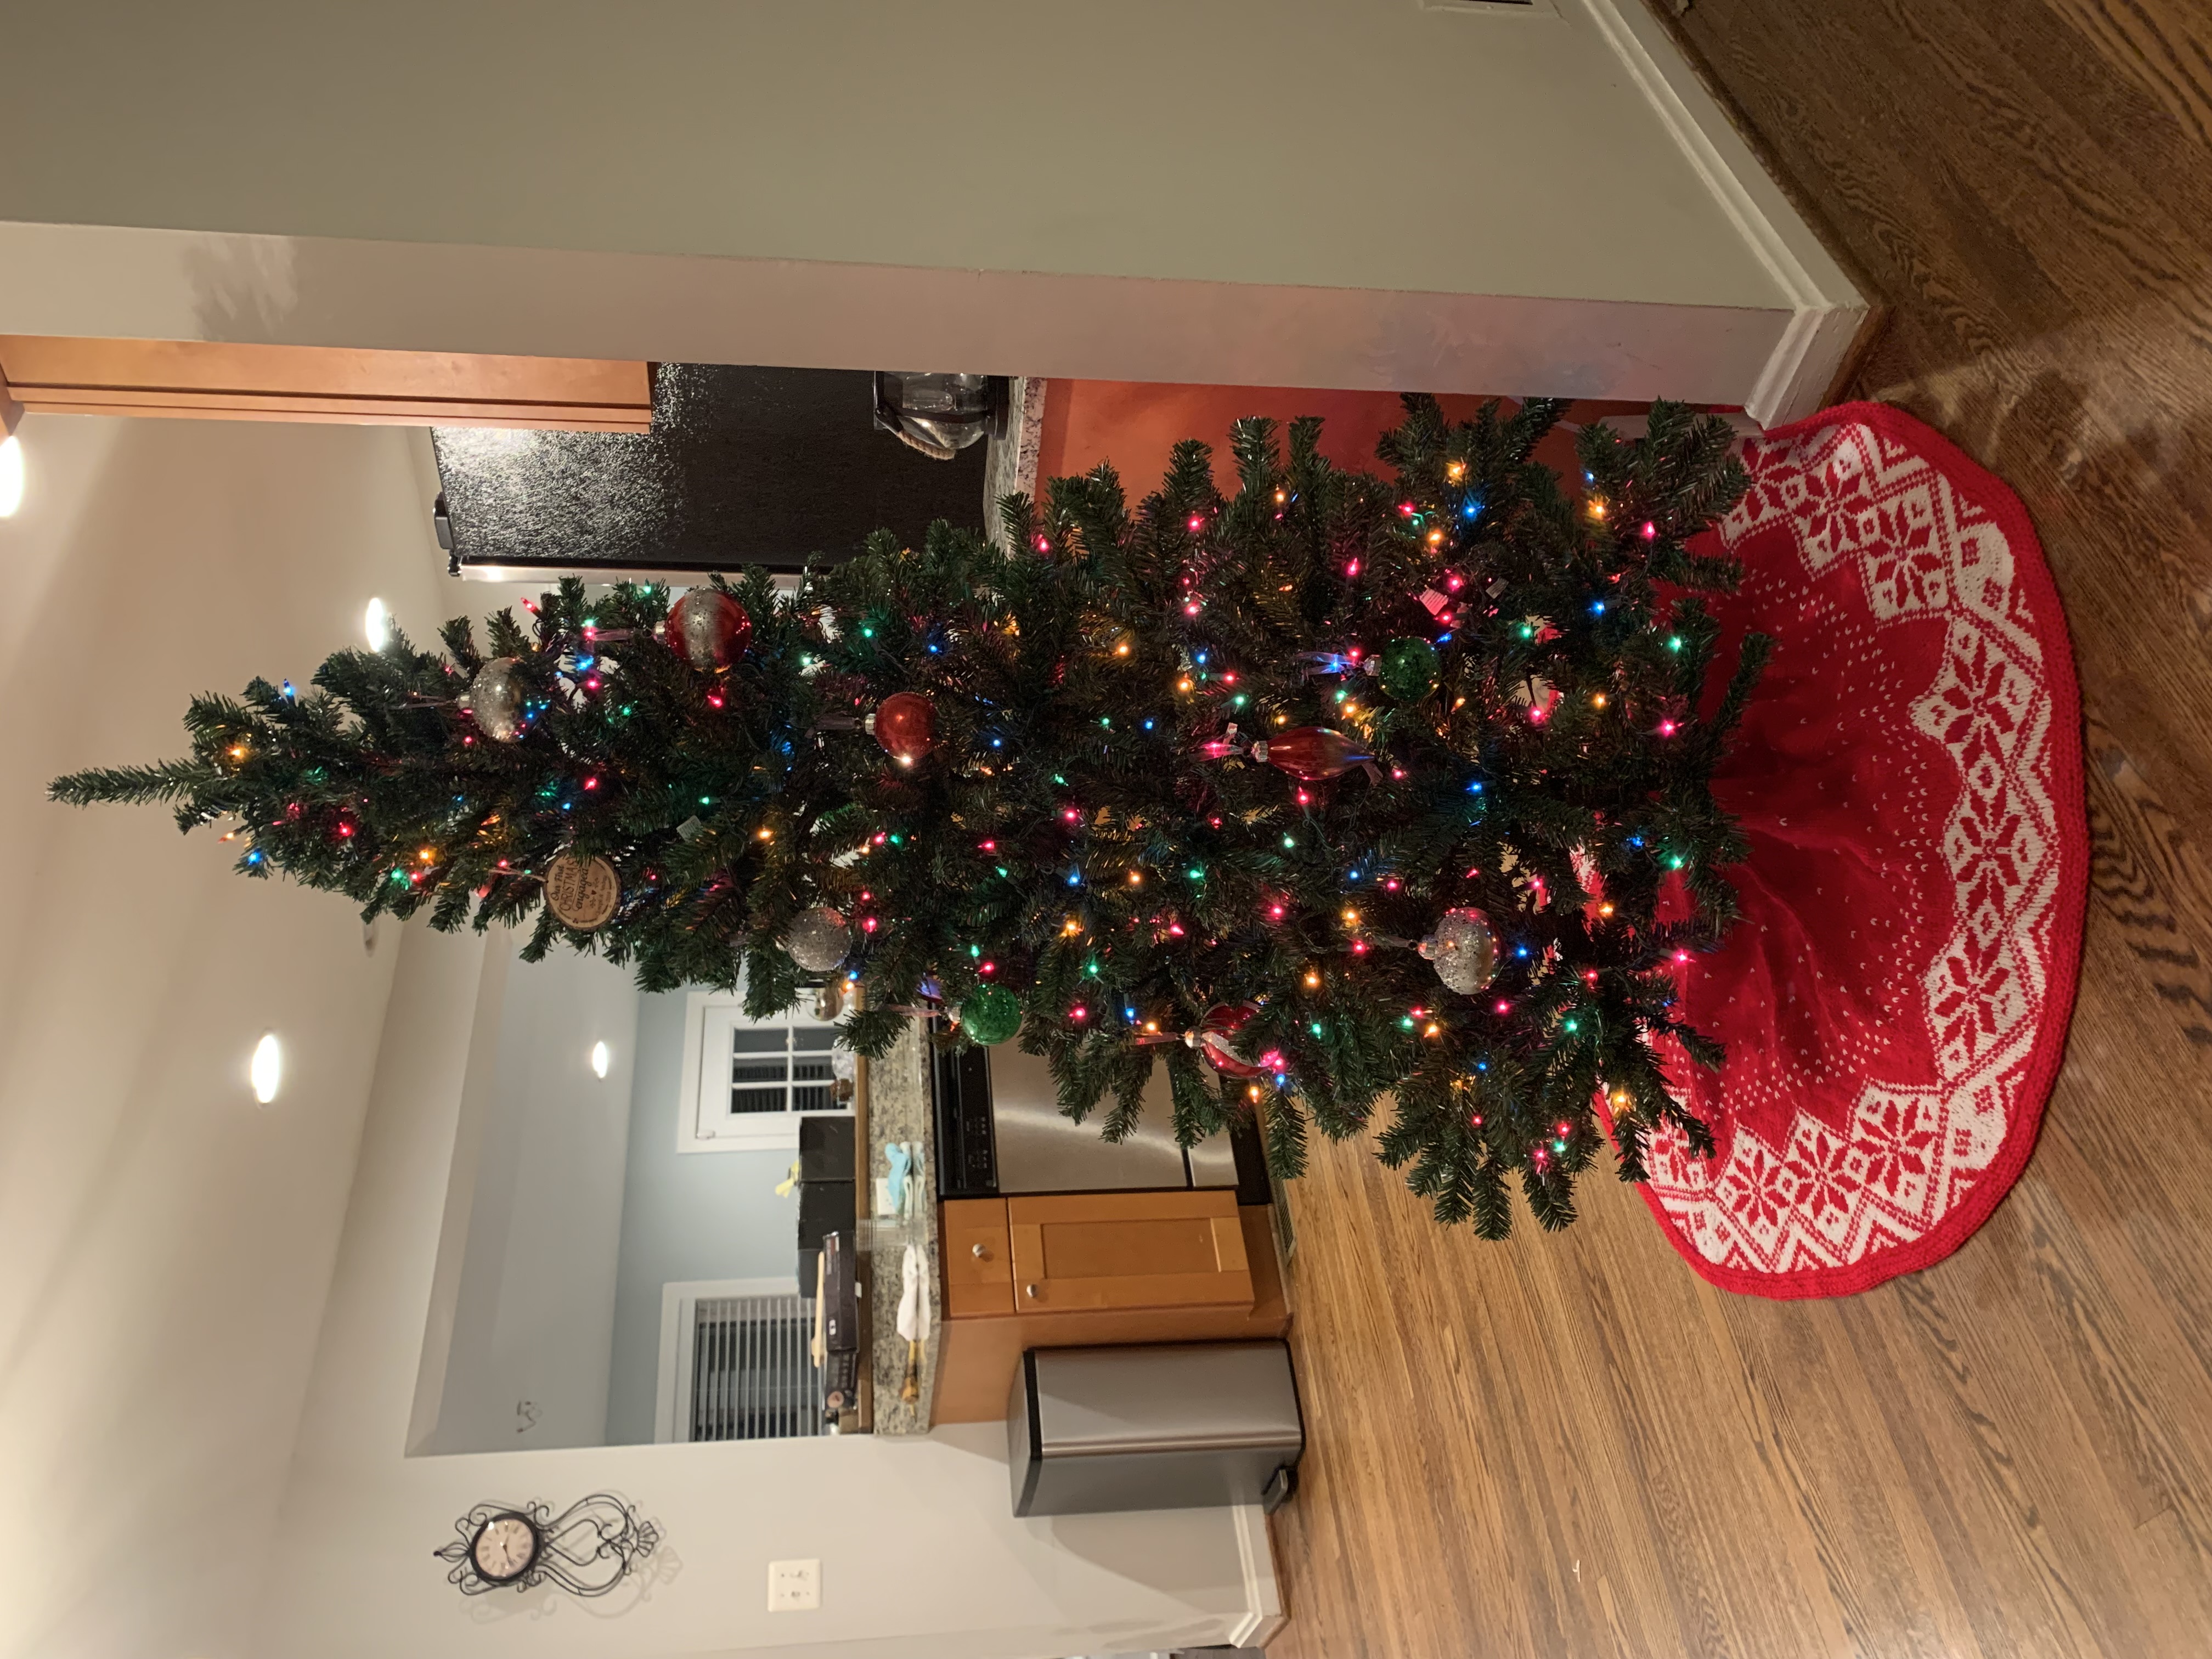
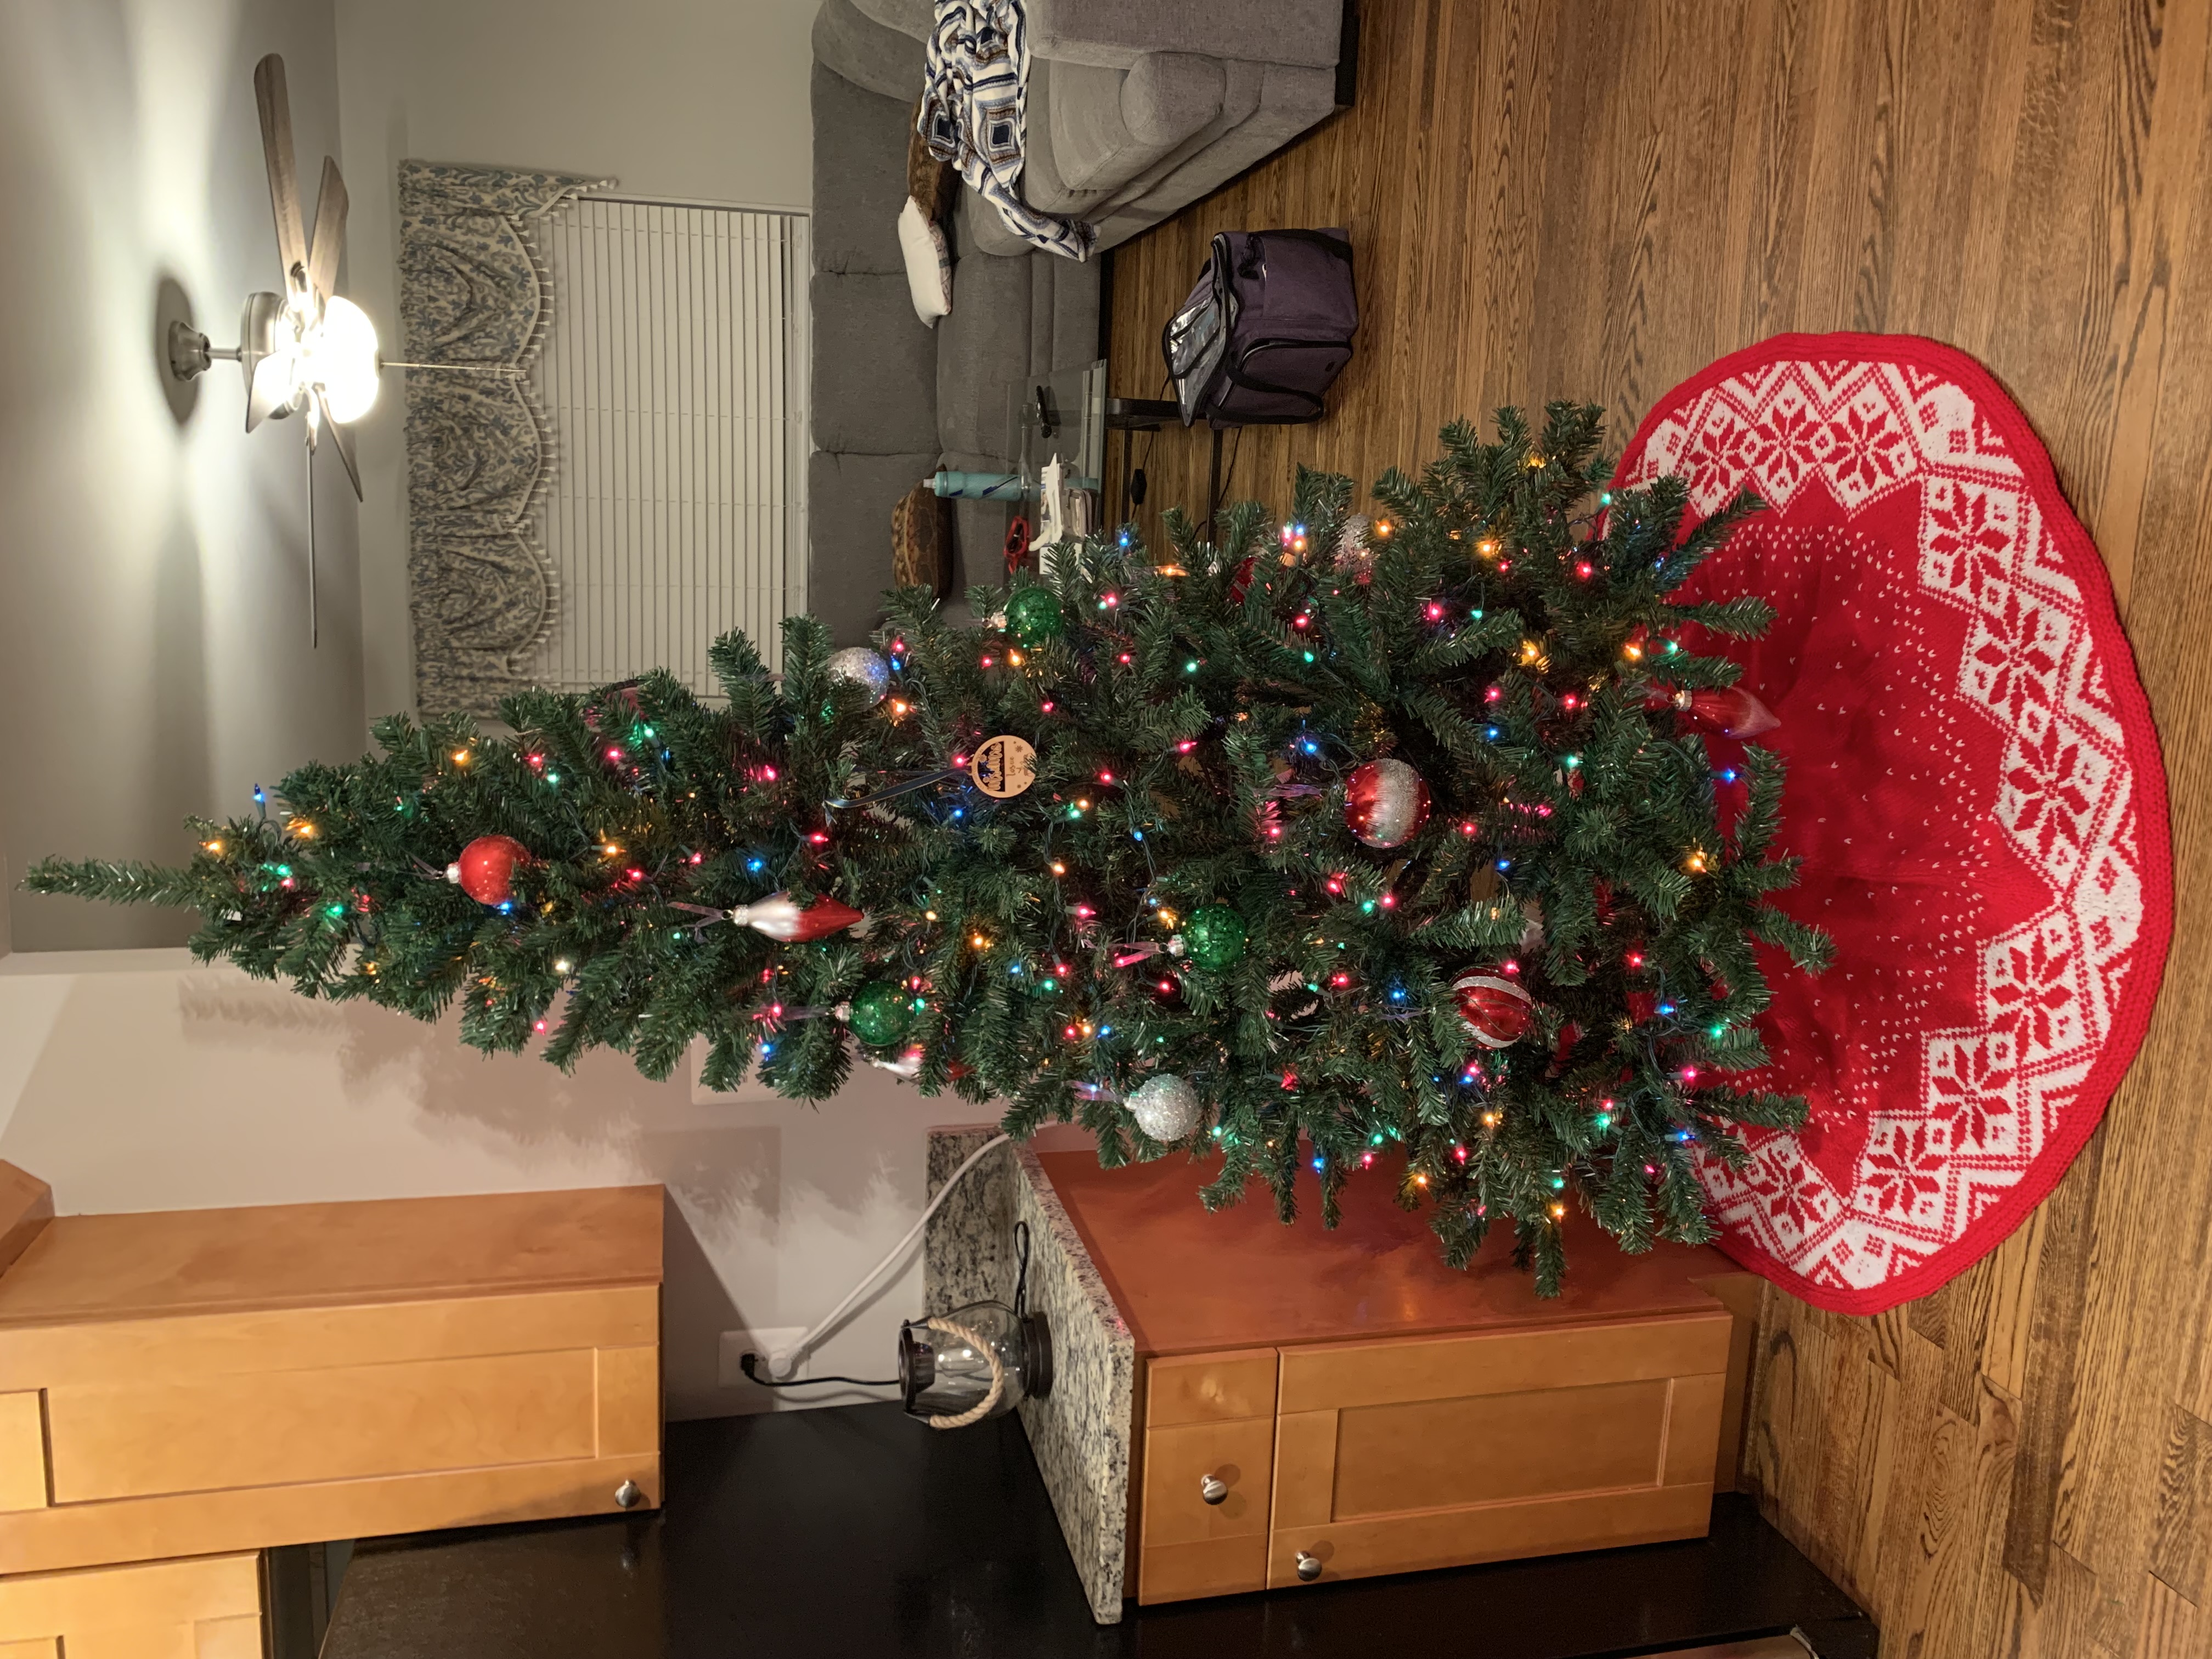
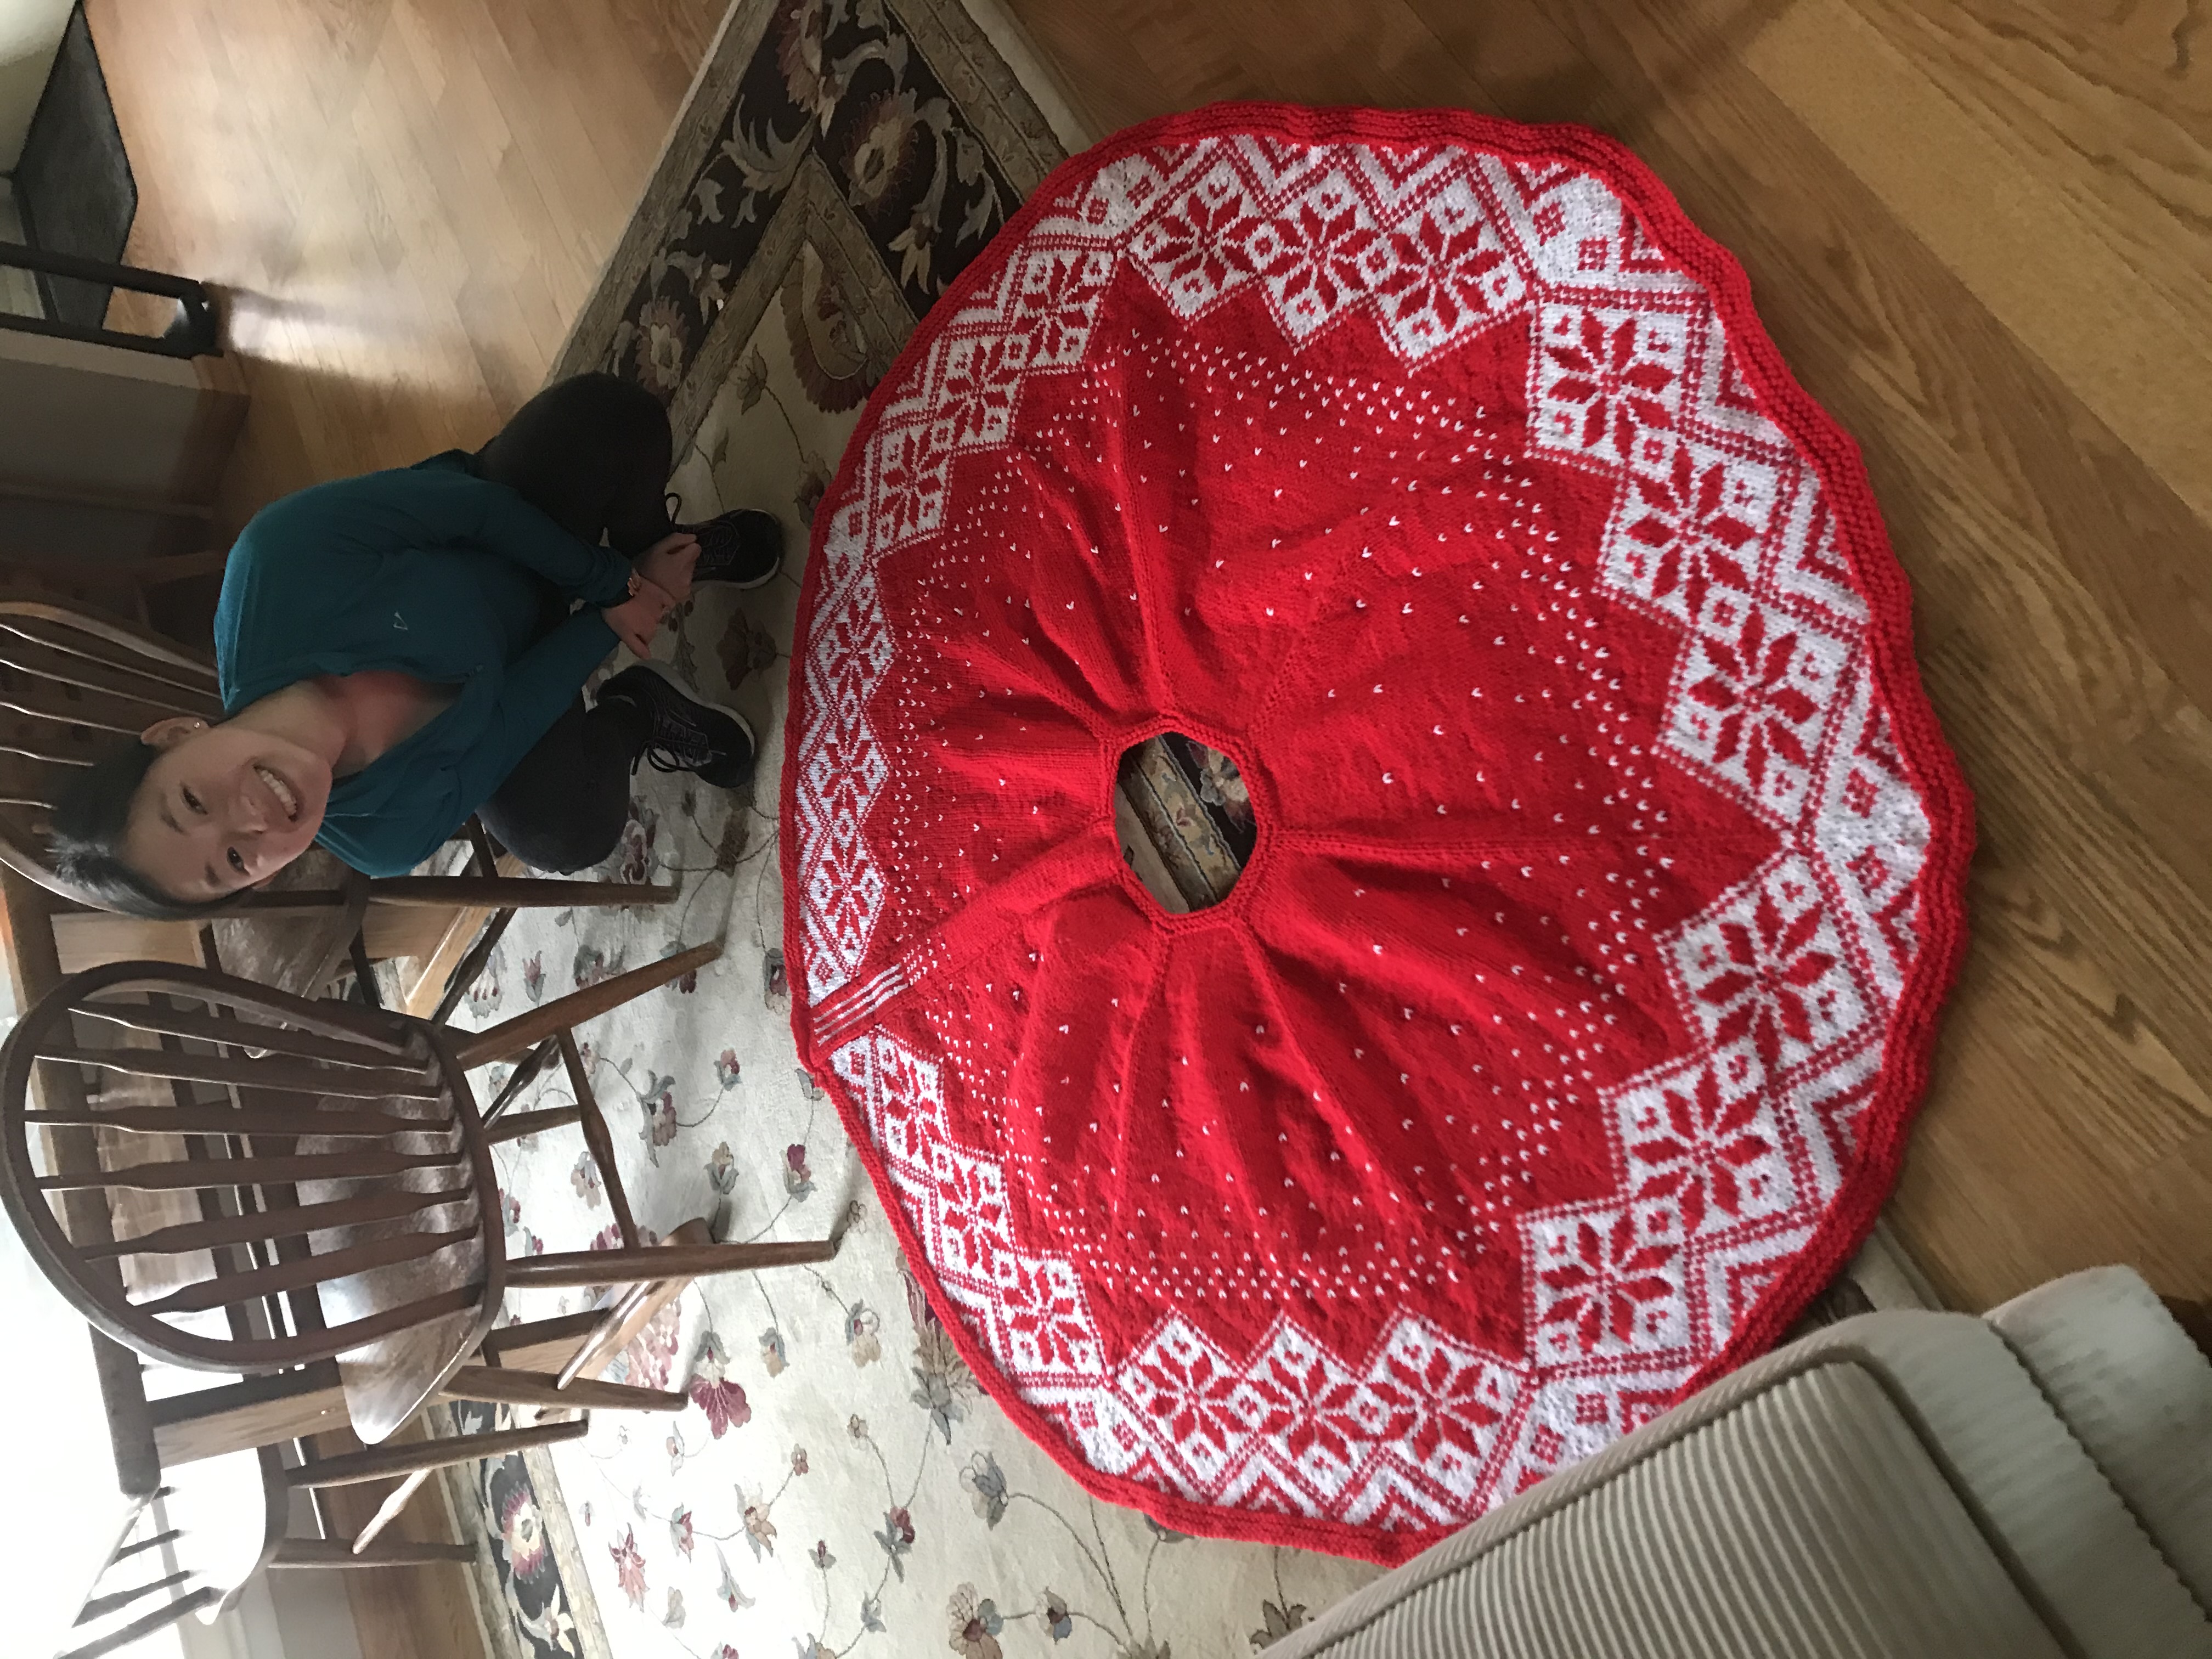
11/17/2021: So we bought a Christmas tree for our new house! But because of the way we furnished the house, we didn’t have a great corner to put our Christmas tree in. The options were in the dining room but then it would never be seen unless we were eating, or smack dab in the middle of the kitchen - so we went with the kitchen! But it is a smaller corner than I was originally anticipating so without steeking the Christmas tree skirt, it was WAY too big in the corner. So I had to steek (eek!).
I prepared it just as I had planned above (and thank goodness for those notes otherwise I would’ve totally forgotten how to do it!). I used white yarn with the same size needle for the facings because I didn’t think I would have enough red for both but it would’ve been beter with red. Anyways it was scary but it all worked out and at least so far, the steek has held!
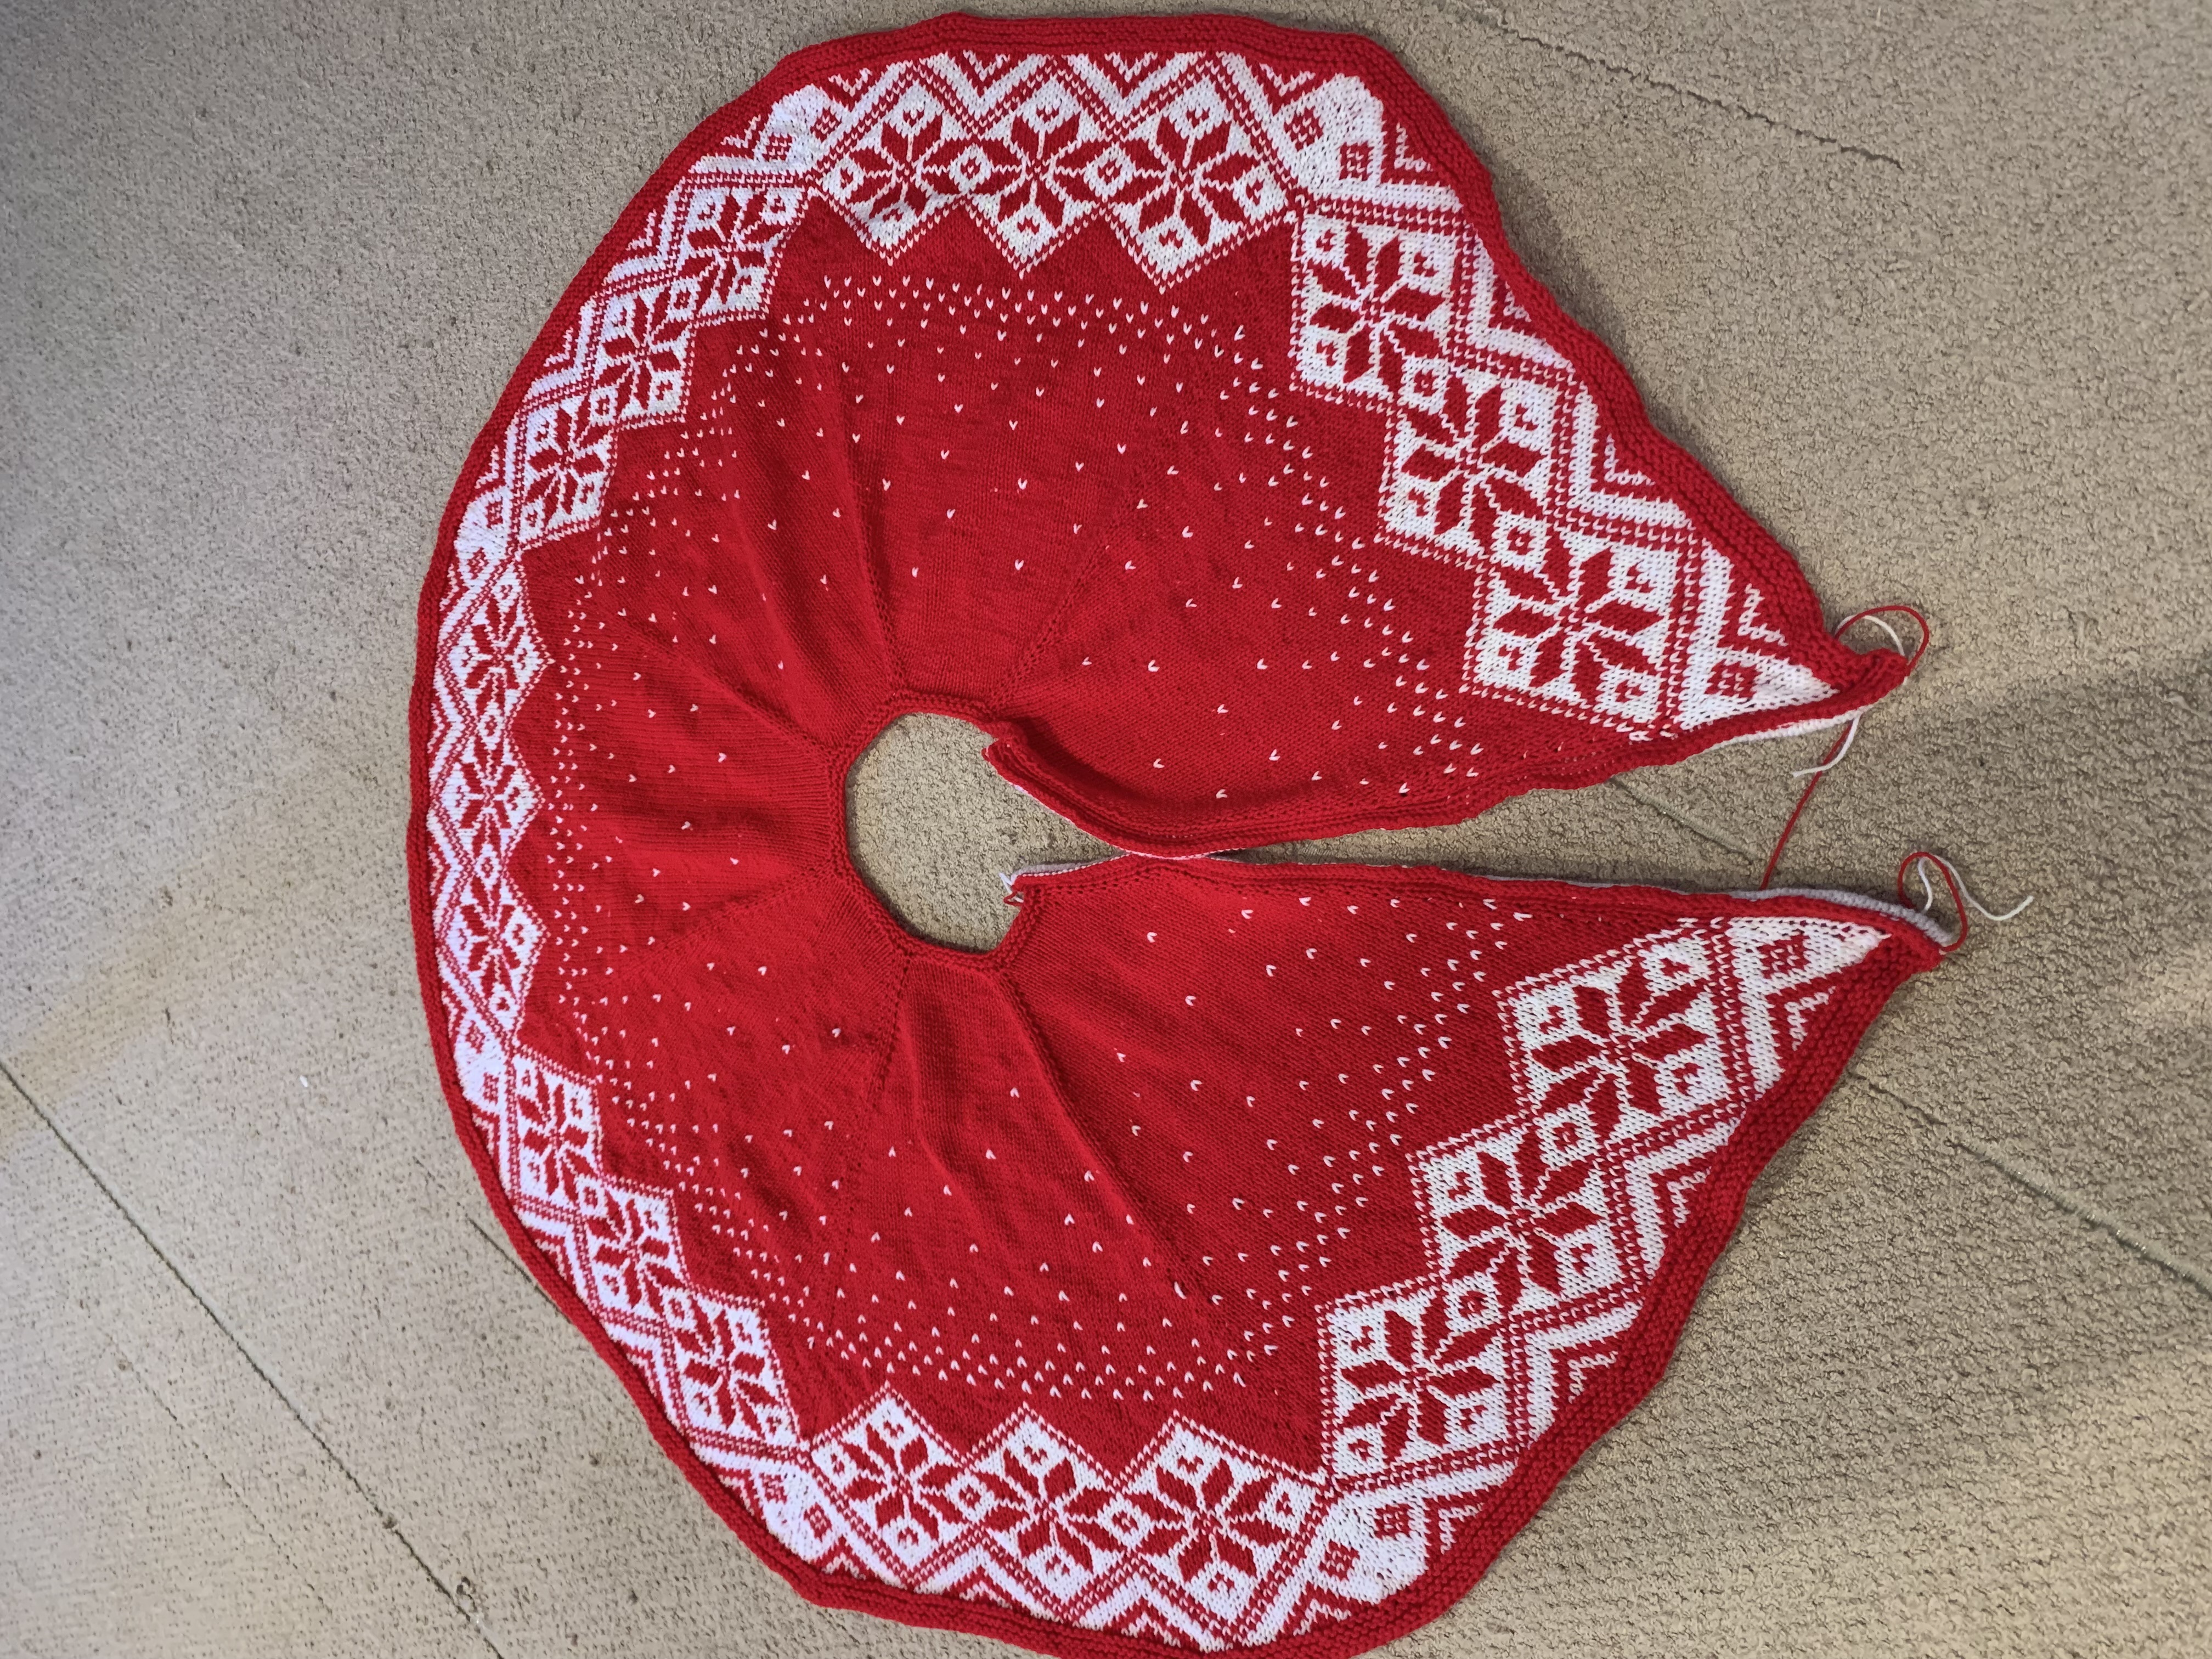
Before (after crochet reinforcement and knit facings):
After:
And now it looks loads better under the tree! :)